|
|
Post by winterjasmine on Dec 3, 2011 8:01:49 GMT -5
So far I've vidded with 4:3 source, and 16:9 source. My new vid source is (according to the back of the DVD) 2.40:1 Anamorphic Widescreen 16:9. Clips from this have black bars, whereas the previous 16:9 source clips (Farscape Season 4) didn't have this. I guess I'm really looking for opinions on the black bars, should you remove them, or not worry. I'm guessing removing them will mean lopping some pixels off the sides too? Personally, black bars don't bother me, (and after vidding mixed aspect ratio in Farscape, I'd really rather avoid the pixel trimming palava,) but I wondered if there was a 'rule' for this? I'm using MPEG Streamclip to convert my VOB files (from the DVD) to Quicktime MOV H264 for use in iMovie HD. Thanks!  Jaz |
|
|
|
Post by obsessive24 on Dec 3, 2011 8:10:09 GMT -5
I don't think there's a "rule". I've seen some people trim off the black bars and some of them have them. I personally like trimming them off, but I think it's a personal preference thing. But you can trim top and bottom without trimming off the sides, no need to worry about that. Exactly how you do it will depend on your program, but I think it can be done if you're willing to experiment with a few pieces of software. Although I'm not mac-savvy enough to tell you exactly how to do it in your case, hopefully someone else can help. |
|
|
|
Post by astarte on Dec 3, 2011 13:04:53 GMT -5
Also not a Mac user, but what Nicky said is how I did this in the past, getting rid of the black bar on top and button with the crop function in my avisynth source script. But I think clipping programs like VirtualDub often have such an option. It's better to let the 1:2.4 stand instead of trimming it down to 1:1.78 like TV series, because movies are filmed differently. Otherwise you'll lose parts of the scene composition and it can look weird. (I have done this when I used The X Files movie for otherwise 1.78 footage.)
|
|
|
|
Post by rhoboat on Dec 3, 2011 13:56:23 GMT -5
The other thing to consider is that keeping the black bars in increases your file size. If you have the ability to cut them off either with your clipping program or with your editor, it might be worth it to save a few MB on your final vid export. |
|
|
|
Post by astarte on Dec 3, 2011 14:06:22 GMT -5
And you can zoom in, if you want to, without a visual motion for the viewer. I forgot to add that.  |
|
|
|
Post by winterjasmine on Dec 3, 2011 14:11:54 GMT -5
I don't think there's a "rule". I've seen some people trim off the black bars and some of them have them. I personally like trimming them off, but I think it's a personal preference thing. But you can trim top and bottom without trimming off the sides, no need to worry about that. Exactly how you do it will depend on your program, but I think it can be done if you're willing to experiment with a few pieces of software. Although I'm not mac-savvy enough to tell you exactly how to do it in your case, hopefully someone else can help. Okay, no rules... this is always good Thanks It's better to let the 1:2.4 stand instead of trimming it down to 1:1.78 like TV series, because movies are filmed differently. Otherwise you'll lose parts of the scene composition and it can look weird. Sorry astarte you lost me a little there  The other thing to consider is that keeping the black bars in increases your file size. If you have the ability to cut them off either with your clipping program or with your editor, it might be worth it to save a few MB on your final vid export. Ah I did not know this... thanks Jaz |
|
|
|
Post by astarte on Dec 3, 2011 14:40:51 GMT -5
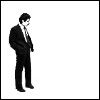
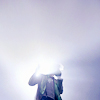
I have done an example with the two aspect ratios and fixed in the middle, which would happen, if you'll trimm of the sides before vidding. The shot is cherographed to fit on a movie screen and not on a TV screen without the bars. |
|
|
|
Post by winterjasmine on Dec 4, 2011 18:12:24 GMT -5
I have done an example with the two aspect ratios and fixed in the middle, which would happen, if you'll trimm of the sides before vidding. The shot is cherographed to fit on a movie screen and not on a TV screen without the bars. Ah this makes sense, thanks! Sometimes these vidding things are so difficult to discuss with words!  I think I've decided to stick with the bars this time round, but it's something I need to investigate a bit more for the future. Right now it's late and I have a cold, so mostly my brain is cotton wool... *sigh*. Thanks for the visual explanation! Also, this? And you can zoom in, if you want to, without a visual motion for the viewer. I forgot to add that. Definitely something I need to come back to with more brain cells. Jaz |
|
|
|
Post by littleheaven on Dec 5, 2011 3:50:25 GMT -5
I learned this lesson the hard way, vidding all 7 seasons of Buffy, which changes from 4:3 to 16:9 at around Season 4 or 5. I posted my completed vid and someone left feedback slating my mixed aspect ratio, so I decided to fix it. There are two main ways I've seen it done - either cut the sides off to bring the 16:9 down to 4:3, or cut off the top and bottom to bring the 4:3 out to 16:9. Personally I prefer cutting the sides off, because often the action is in the middle of the screen and not often right out to each side, whereas I find TV often fills the screen top to bottom with the subject, and when you cut the top and bottom off you tend to lop off scalps and feet. Which is sad, because widescreen is prettier, IMO. Anyway, what I did was set up a preset crop in my pan/crop effect so that any clip in 16:9 was easily trimmed down by selecting it from the drop-down menu. Then I could pan left and right as needed to make sure I got what I wanted in shot. That led to lots more adjusting the crops to the point where even some of the 4:3 clips were cut down to accentuate a particular part of the shot. It opened up a whole new world for me. If all the source is in the same aspect ratio, and you have black bars, then personally I would trim them off. Vegas has a function in the project properties where you can make your project settings match your media, and I always do that at the beginning of the vid to make sure I don't have any frame rate conflicts or whatever, and that automatically adjusts the margins of my vid to however wide the picture actually is. Makes life so much easier than manually cropping each clip.  |
|
|
|
Post by obsessive24 on Dec 5, 2011 7:10:15 GMT -5
If all the source is in the same aspect ratio, and you have black bars, then personally I would trim them off. Vegas has a function in the project properties where you can make your project settings match your media, and I always do that at the beginning of the vid to make sure I don't have any frame rate conflicts or whatever, and that automatically adjusts the margins of my vid to however wide the picture actually is. Makes life so much easier than manually cropping each clip. Agreed in theory, although have you ever vidded a movie source of 2.35:1 which is encoded to DVD as 1.78:1? I've seen that happen on occasion, which means the DVD image itself has letterboxing black bars on top and bottom of the picture, and if you try to set it to a 2.35:1 project setting, you effectively get a really squished picture without getting rid of the black bars. Now you could expand the entire clip to 1.78:1 so you don't see the black bars, but that means you chop off the sides. In those cases I think it's better to just export as-is (at 1.78:1), then trim off the black bars externally via avisynth/virtualdub, so you end up with a true 2.35:1 vid with no letterboxing. Premiere 6.5 had a crop function that you could apply while exporting. I really miss that. I don't even think that feature made it to Premiere Pro... or if it did, I couldn't find it. Yet another reason why I jumped ship from Premiere. ;D |
|
|
|
Post by franzeska on Dec 5, 2011 11:16:29 GMT -5
I'm using MPEG Streamclip to convert my VOB files (from the DVD) to Quicktime MOV H264 for use in iMovie HD. If I'm understanding correctly, you're not doing a mixed-aspect ratio vid, you're just vidding with an aspect ratio you haven't used before? If so, this is easy to handle. The current black bars make your footage 16:9, which is a standard project setting in iMovie. Leave them alone for now. Finish your vid in iMovie. Export as DV (i.e. don't do any size reduction as you export--iMovie does a bad job of this). When preparing your vid for the web, take the huge exported file and use MPEG Streamclip again to re-convert it into Quicktime MOV H264. Trim the bars off as you do so. (Or not if you don't want. I don't think it matters that much.) MPEG Streamclip lets you specify the number of pixels you're trimming off of each side as well as specifying custom aspect ratios and sizes for the final product. I like removing letterboxing as the final step in a single aspect ratio vid because it means a bad decision only affects that last, web-ready file. It's easy to just convert it again until it looks right. Foolish Passion has a screencap of the MPEG Streamclip export settings. 'Crop' is a ticky box near the bottom. |
|
|
|
Post by legoline on Dec 5, 2011 11:58:37 GMT -5
which means the DVD image itself has letterboxing black bars on top and bottom of the picture My The Eagle DVD seems to have those black bars inside the image itself. I tried every possible setting in SV but to no avail. Nicky's Avisynth tutorial worked wonders to resolve the issue. |
|
|
|
Post by littleheaven on Dec 5, 2011 15:55:18 GMT -5
Agreed in theory, although have you ever vidded a movie source of 2.35:1 which is encoded to DVD as 1.78:1? I've seen that happen on occasion, which means the DVD image itself has letterboxing black bars on top and bottom of the picture, and if you try to set it to a 2.35:1 project setting, you effectively get a really squished picture without getting rid of the black bars. Ah, I get it. And no, I've not come across that. I think in that situation I'd crop the entire source first, as you suggest. |
|
|
|
Post by dragonchic on Dec 5, 2011 18:42:43 GMT -5
Premiere 6.5 had a crop function that you could apply while exporting. I really miss that. I don't even think that feature made it to Premiere Pro... or if it did, I couldn't find it. Yet another reason why I jumped ship from Premiere. ;D It came back later (not sure exactly when, but it's in CS4). Guess they realized how annoying it was to lose.  |
|
|
|
Post by winterjasmine on Dec 6, 2011 17:21:26 GMT -5
I'm using MPEG Streamclip to convert my VOB files (from the DVD) to Quicktime MOV H264 for use in iMovie HD. If I'm understanding correctly, you're not doing a mixed-aspect ratio vid, you're just vidding with an aspect ratio you haven't used before? If so, this is easy to handle. The current black bars make your footage 16:9, which is a standard project setting in iMovie. Leave them alone for now. Finish your vid in iMovie. Export as DV (i.e. don't do any size reduction as you export--iMovie does a bad job of this). When preparing your vid for the web, take the huge exported file and use MPEG Streamclip again to re-convert it into Quicktime MOV H264. Trim the bars off as you do so. (Or not if you don't want. I don't think it matters that much.) MPEG Streamclip lets you specify the number of pixels you're trimming off of each side as well as specifying custom aspect ratios and sizes for the final product. I like removing letterboxing as the final step in a single aspect ratio vid because it means a bad decision only affects that last, web-ready file. It's easy to just convert it again until it looks right. Foolish Passion has a screencap of the MPEG Streamclip export settings. 'Crop' is a ticky box near the bottom. That's right, I've done mixed aspect ratio before, thankfully this is far less painful. I think my confusion was in the 2.40:1 on the back of the DVD, because it sure does look like 16:9. I should have realised the (now) painfully obvious solution. I used MPEG Streamclip to crop pixels off when vidding with the mixed aspect ratios, and I use MPEG Streamclip in exactly the way you explain during export, but for some reason I had not thought of cropping the bars off during the export as I did during import of the clips. I have no idea why this didn't compute in the old grey matter! Lol! Thanks for giving me a light-bulb moment (On reflection I think it's got something to do with following tutorials, really good tutorials, that don't require you to understand what you're doing, just to follow directions ) Okay, brace yourself here comes another stupid question Do you really need to crop the bars off, will the viewer's media player not just create black bars to maintain the aspect ratio when they view it on their computer screen? I should really not post in the tech folder after a 12.5 hour shift. Jaz PS: littleheaven, sorry I don't think I was clear in my explanation of the problem / question (see comment above about not posting after long shifts at work ), thanks for your comments on vidding mixed aspect ratio, I've done that before - with my first vid no less (thanks Farscape!) but I made my 4:3 clips 16:9. I was told that was easier maths than the other way, but certainly came up against the problem you mention about having to crop quite close to the action. Close-ups were really difficult, and if there was a lot of movement in the clip, or different camera angles, I would have to crop differently for each one, before the clips were even imported to the timeline! Lots of pre-planning required! Luckily I'd pretty much made the vid in my head before starting! Anyway, long story short - I feel your pain, and I'd be interested to try your way next time! Edited about a billion times for all sorts of formatting and spelling fail. Going to bed now. |
|


 I think I've decided to stick with the bars this time round, but it's something I need to investigate a bit more for the future. Right now it's late and I have a cold, so mostly my brain is cotton wool... *sigh*. Thanks for the visual explanation!